Connecting Google Cloud Run with on-prem resources
Learn how to securely connect Google Cloud Run to your on-premises resources using a Classic VPN and Direct VPC Egress. This guide includes a Terraform lab and a Python validation app to help you master hybrid cloud networking.
A frequently asked question in hybrid cloud adoption is how to enable Google Cloud Run containers to access private resources located in an on-premises network. This capability is crucial for organizations building microservices that interact with legacy systems. In this article, I will try to clearly explain the methodology, detail the necessary Google Cloud resources and network configurations, and provide a complete Terraform code example that you can immediately deploy into your own environment.
What is Google Cloud Run?
At its core, Google Cloud Run provides a robust, fully managed environment for stateless container execution, triggered by standard HTTP requests. Because it accepts standard Docker and OCI-compatible containers, you are free to use any language or framework - whether it's Python APIs, a Node.js backend, or a Java microservice - without worrying about runtime lock-in.
From a networking standpoint, the platform automatically provisions secure HTTPS endpoints, complete with automatic TLS certificate management, global load balancing, and optional CDN integration. Its incredible cost efficiency is driven by a 'scale-to-zero' model, ensuring absolutely no charges during idle periods, yet offering near-instantaneous startup times when traffic resumes.
All ingress and egress traffic is efficiently routed through Google's high-performance network. While a public URL is provided by default, developers retain full control, allowing configuration for private VPC access, custom domain mapping, and advanced traffic steering between different service revisions.
Preparing your VPC to be connected to Cloud Run
To begin, you must have a VPC and a dedicated subnet within your target region. When sizing this subnet, it is important to understand how Cloud Run consumes network resources. In this context, an instance is a single running copy of your Docker container. If traffic spikes and one container can no longer handle the load, Cloud Run spins up additional instances (identical containers) to share the work. By default, one instance can handle 80 concurrent requests, this can be changed up to 1000.
From a networking perspective, each instance requires its own "space" in your VPC. Cloud Run reserves IP addresses in blocks of 16 (a /28 subnet mask) at a time. To ensure you have enough headroom for growth, Google recommends a subnet range of /26 or larger.
The math is based on a "2X" rule: at any given time, Cloud Run uses two IP addresses for every active instance. However, you must also account for the 20-minute "cooldown" period where Cloud Run holds onto IPs after an instance scales down to ensure smooth traffic transitions.
For example:
- If you have 15 active instances, Cloud Run will have reserved at least 32 IP addresses (two blocks of 16).
- If you then deploy a new version of your code, Cloud Run will spin up 15 new instances for the new version while the 15 old instances begin to shut down.
- Because the old IPs are retained for 20 minutes, you would temporarily need 60 IP addresses ((15 + 15) * 2) to support that single update.
Always size your subnet with this "overlap" in mind to prevent deployment failures during scaling or updates.
Routing Cloud Run Traffic into your VPC
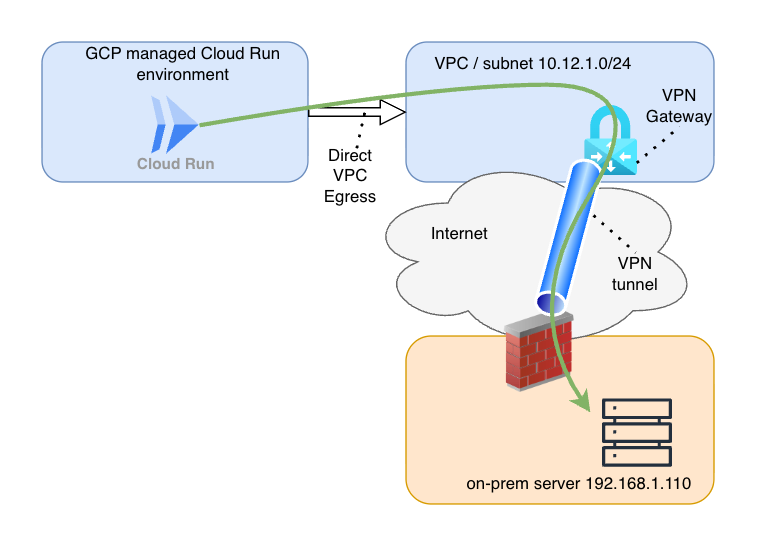
To route your traffic correctly, you need to build a "bridge" between the managed Cloud Run environment and your private VPC. This is done using a feature called Direct VPC Egress (or the older Serverless VPC Access Connector, but Google recommends to use Direct VPC Egress).
Think of this as plugging a virtual ethernet cable from your container directly into the subnet we prepared in the previous step. Once this connection is established, your container is no longer shouting into the public internet; it is a member of your private network.
When configuring this, you will encounter a critical setting called Traffic routing. You generally have two choices:
- Private ranges only: Only traffic destined for RFC 1918 IP ranges (
10.0.0.0/8, 172.16.0.0/12, 192.168.0.0/16) goes through your VPC. - All traffic: Every single request leaving the container is routed through your VPC.
For reaching on-premises resources via a VPN tunnel, All traffic is often the most reliable choice. This ensures that when your application tries to hit an on-prem IP address, the request is forced into your VPC, where it can follow your static routing/Cloud Router and VPN Gateway paths to reach your local data center.
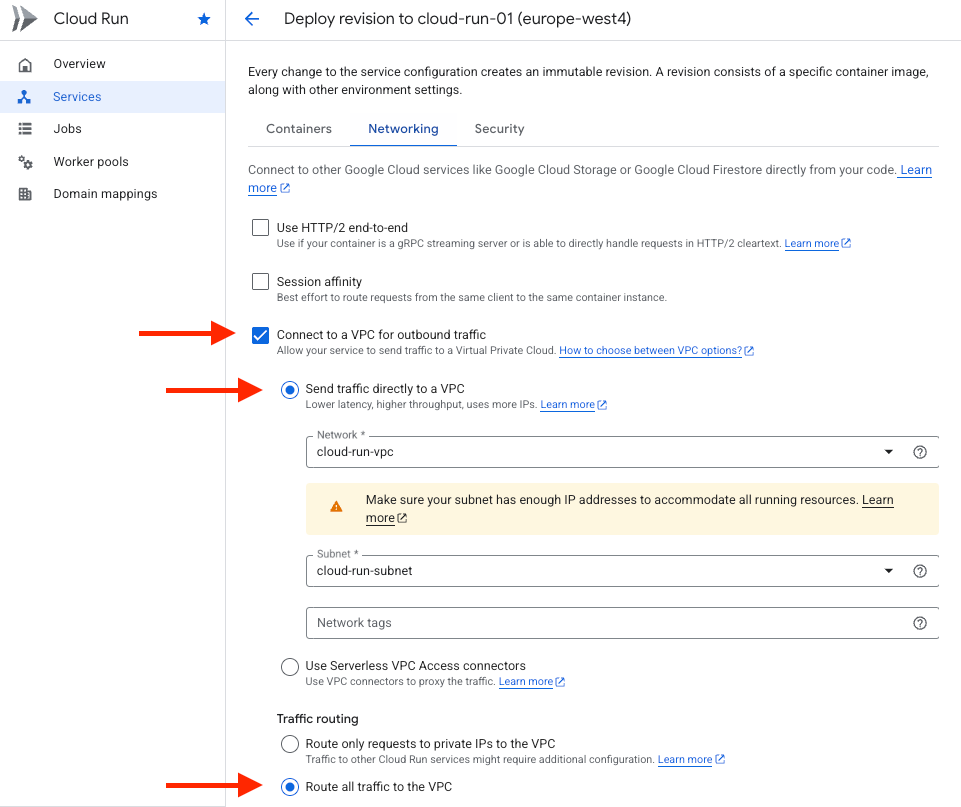
On the Google Cloud Console, you can change your existing Cloud Run service by deploying a new revision and change the networking settings like this:
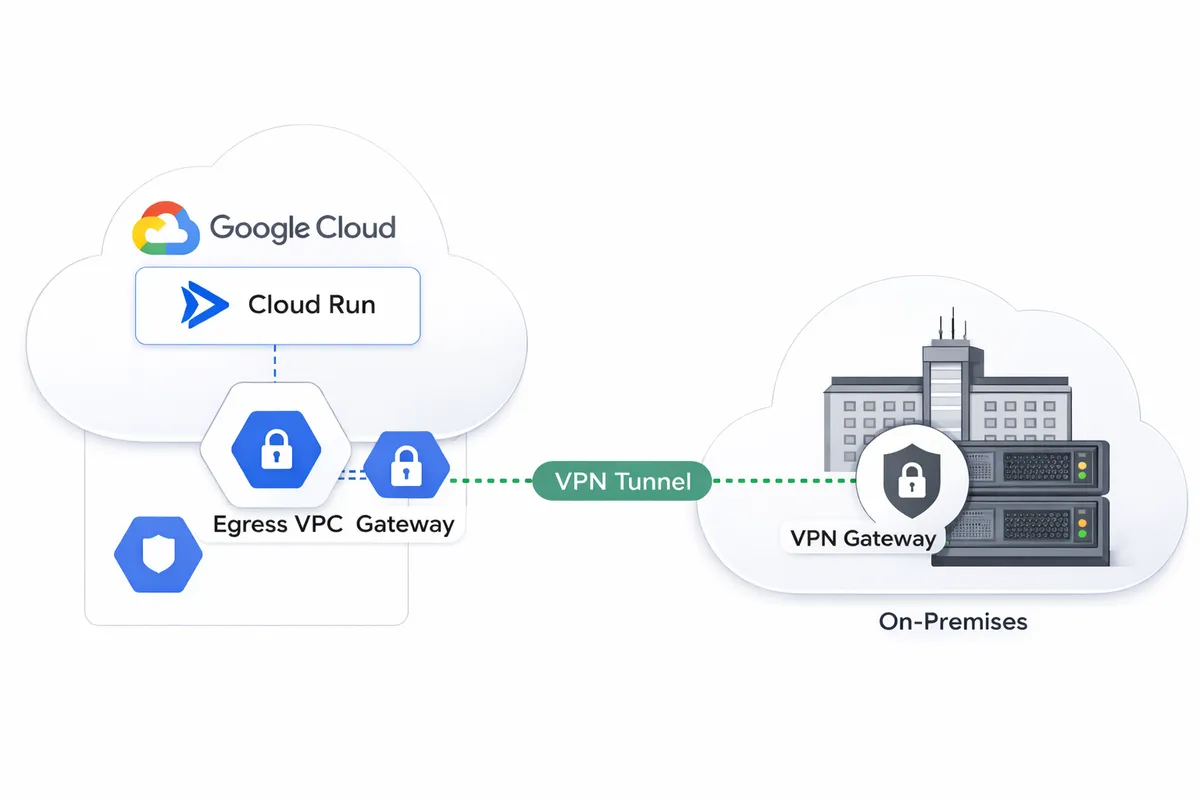
Connecting the VPC to On-Premises
Now that your Cloud Run traffic is flowing into your VPC, it needs a secure path to travel the "last mile" to your on-premises network. In the world of Google Cloud, this is typically handled by either Dedicated Interconnect or Cloud VPN.
Think of Interconnect as a private, physical fiber line between your data center and Google - it offers the highest performance but comes with a significant price tag. For many scenarios, Cloud VPN is the ideal alternative: it creates a secure, encrypted tunnel using the public internet as the transport medium, providing a private bridge without the need for custom hardware.

In this guide, we are focusing on a Classic VPN tunnel using static routing. While Google Cloud’s High Availability (HA) VPN is the standard for production environments requiring 99.99% uptime, the Classic option remains a popular choice for straightforward, "no-frills" connectivity.
The biggest advantage of this static setup is simplicity. Because we are manually defining our routes, we can skip the complexity of a Cloud Router. You won't have to worry about configuring BGP (Border Gateway Protocol) or managing Autonomous System Numbers (ASNs) - you simply tell the network exactly where to go.
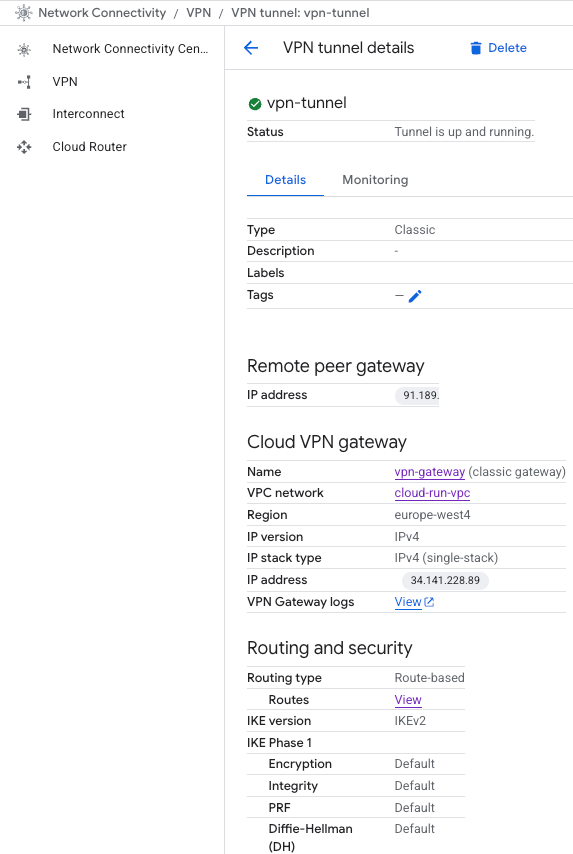
When you use the VPN creation wizard in the Google Cloud Console, you are essentially building two components at once:
- The VPN Gateway: This is the regional resource that "lives" in your VPC and acts as the front door for your encrypted traffic.
- The VPN Tunnel: This is the specific IPsec connection between your VPN Gateway and your on-premises firewall.
During the setup, you'll need to provide several key IPsec parameters to ensure both sides can "shake hands" securely:
- Remote Peer IP: The public static IP address of your on-premises router or firewall.
- IKE Version: Usually IKEv2 for modern security and better stability.
- Pre-shared Key (PSK): A secret "password" shared between both ends to authenticate the connection.
- Routing Options: You'll choose between Route-based (which uses a virtual interface) or Policy-based (which defines specific local and remote IP ranges). For most Cloud Run scenarios, route-based is preferred for its flexibility.
By the end of this wizard, you will have a stable, encrypted pipe ready to carry traffic from your serverless containers directly to your private local servers. A static route is needed for the destination IP range, to point to the right VPN tunnel.
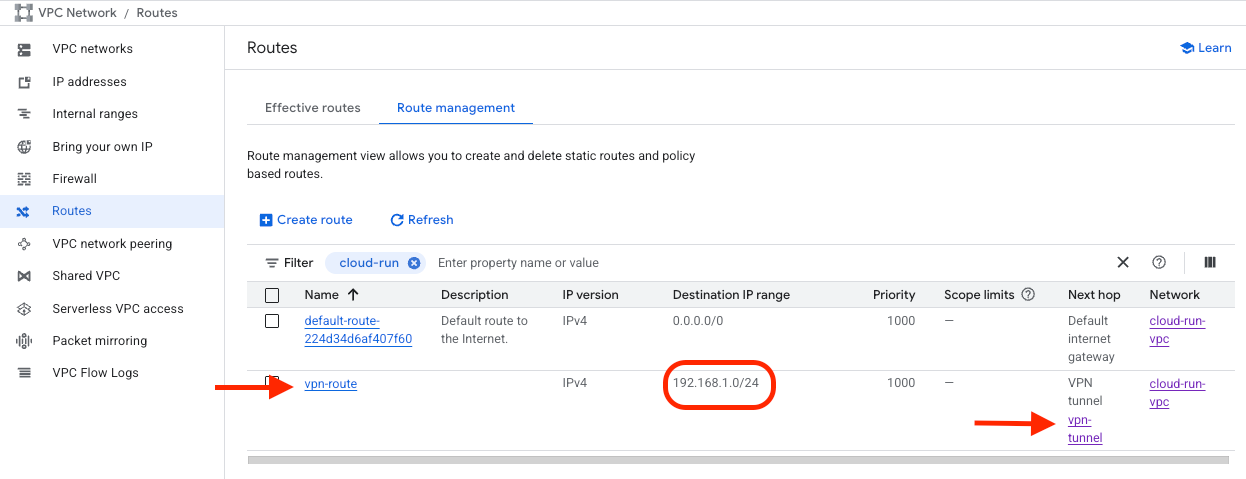
Once the on-prem vpn device is configured properly, the vpn tunnel should be up and running. We can test connectivity between our Cloud Run and the on-prem server.
Confirming the Connection
With the infrastructure in place, the final step is to validate that traffic can successfully traverse the path from the public internet, through Cloud Run, across the VPN, and into your on-premises environment.
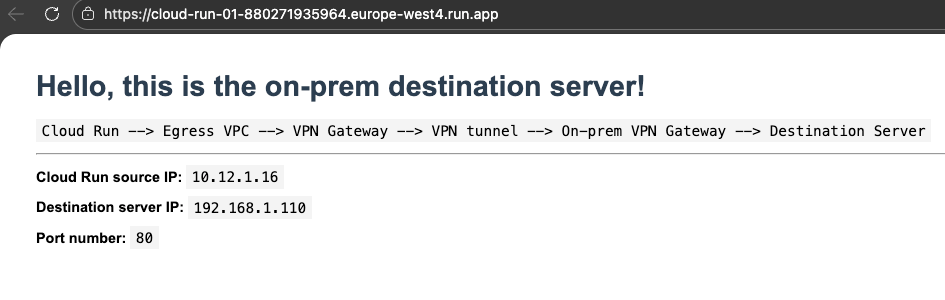
To test this, I deployed a lightweight Python-based validation service to Cloud Run. This application acts as a bridge: it listens for external HTTP requests on its public URL and attempts to proxy those requests to a specific internal resource - in this case, an on-premises web server located at 192.168.1.110:80.
When visiting the Cloud Run service's public URL, the successful response from the on-premises web server provides the final piece of the puzzle. By inspecting the request details, we can see that the source IP belongs to our private VPC subnet rather than a public Google range. This HTTP response definitively proves that the entire chain is functional: Cloud Run is successfully egressing into the VPC, the routing table is correctly handing traffic to the VPN gateway, and the tunnel is successfully transporting packets to our local data center.
Test This in Your Own Environment: Terraform and gcloud
Theory is important, but nothing beats hands-on experience. If you have access to an environment where you can establish a VPN tunnel, this project offers an excellent opportunity to master the intersection of cloud networking and serverless architecture. By deploying this lab, you’ll gain practical experience with IPsec tunnel configuration, VPC routing, and advanced Cloud Run egress settings.
To help you get started, I have provided a complete Terraform configuration that automates the deployment of:
- The VPC and Subnet (pre-sized for Cloud Run scaling).
- The Classic VPN Gateway and the VPN Tunnel (Google Cloud-side).
- The necessary Static Routes to point traffic toward your on-premises network.
Alongside the infrastructure code, you will find gcloud commands to deploy the Python validation application with Direct VPC Egress fully enabled. All you need to do is provide your local environment's specifics—such as your on-premises public IP and your destination server address.
Even free members of my website can access this repository and start testing this on their own. I you are a member already, please login to see the details further in this article. If not a member yet, please see the subscribe options, including a free tier.