Deploy a Private Website with Cloudflare Zero Trust and Terraform
What is Cloudflare Zero Trust?
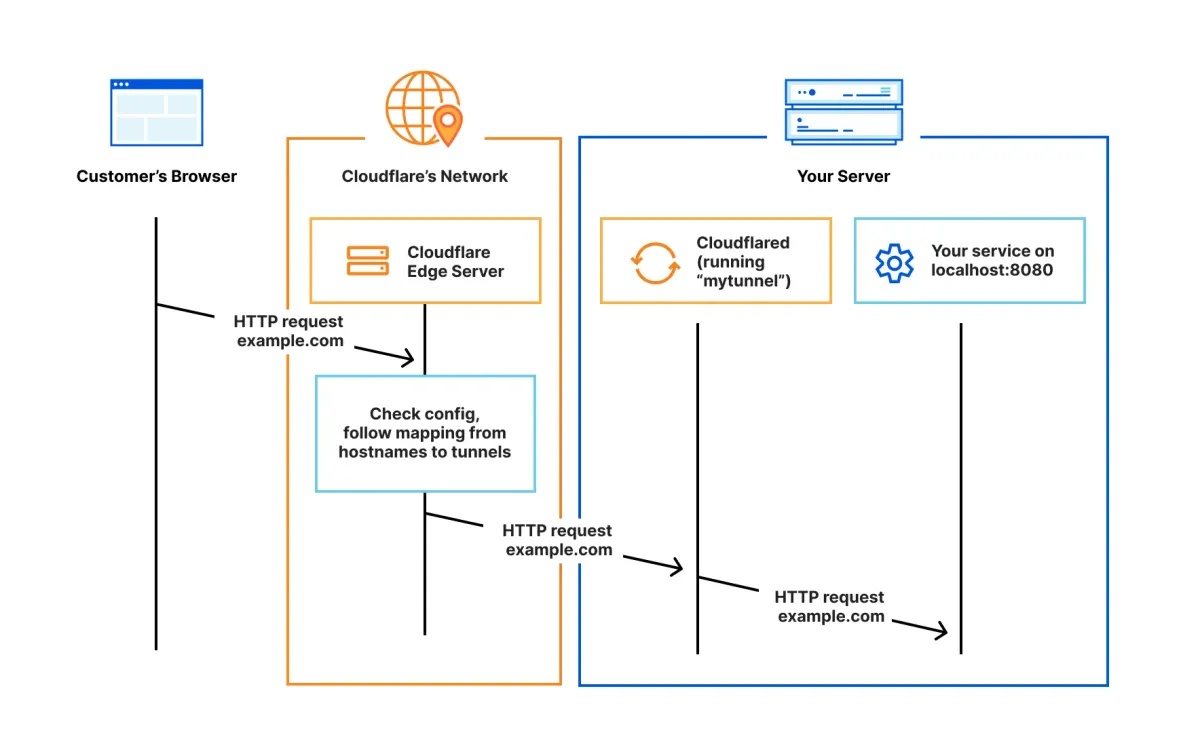
Cloudflare Zero Trust is a security platform that lets you control who can access your internal or private applications — without using a traditional VPN.
It works by placing your applications behind Cloudflare’s global network and requiring users to authenticate (for example, via email or their Google/Microsoft account) before they can reach them.
In this article, I’ll walk you through how to deploy a simple website on a virtual machine and secure it using Cloudflare Zero Trust Access.
This setup ensures that only authorized users can reach your site.
Of course, restricting access is optional. You can also use Cloudflare Zero Trust simply as a secure and performant entry point for a public website — just like the one you’re reading now (this website is also published via Cloudflare Zero Trust).
Prerequisites
Before we jump into the Terraform deployment, you’ll need a few things prepared in advance. Here’s what’s required:
- Cloudflare account: Free to create - anyone can sign up in minutes.
- A domain name: You can use an existing one and transfer it to Cloudflare, or purchase one directly through Cloudflare. The domain must be managed by Cloudflare in order to use Zero Trust.
- Enable Cloudflare Zero Trust: Activate it in your Cloudflare dashboard.
- A place to run your website: This can be a virtual machine, a PaaS platform, or even an old ThinkPad collecting dust in the corner.
In this guide, I’ll use a virtual machine deployed in Google Cloud, so you need an existing Google Cloud VPC network as well.
Collect the Cloudflare Account details for Terraform
Next, we’ll gather the required Cloudflare details so Terraform can deploy the resources automatically.
Create a file called terraform.tfvars with the following variables:
cloudflare_zone = "gergovadasz.hu" // put your domain name
cloudflare_zone_id = "ce...."
cloudflare_account_id = "7a...."
cloudflare_email = "[email protected]"
cloudflare_token = "b6...." // token generated by Cloudflare
gcp_project_id = "gcp_project_id" // use your own GCP project
zone = "europe-west4-a" // change to zone you prefer
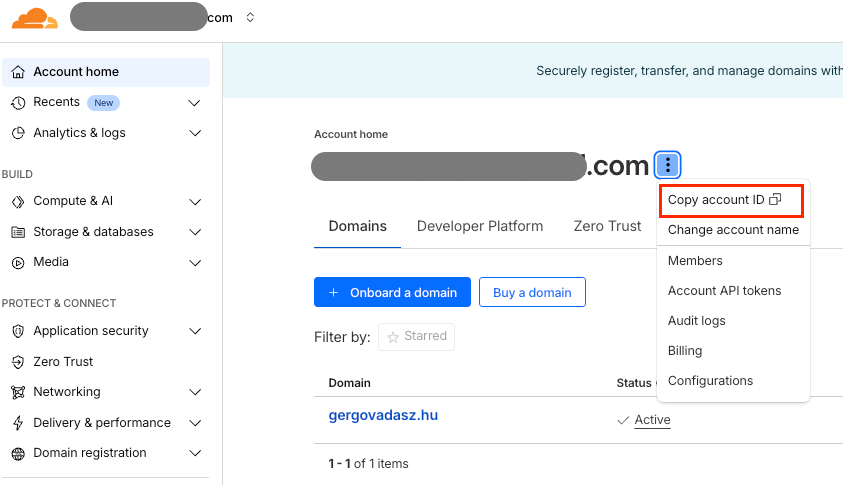
machine_type = "e2-small" // this is a small and cheap VM sizeAccount ID - available on your Cloudflare Account Home page
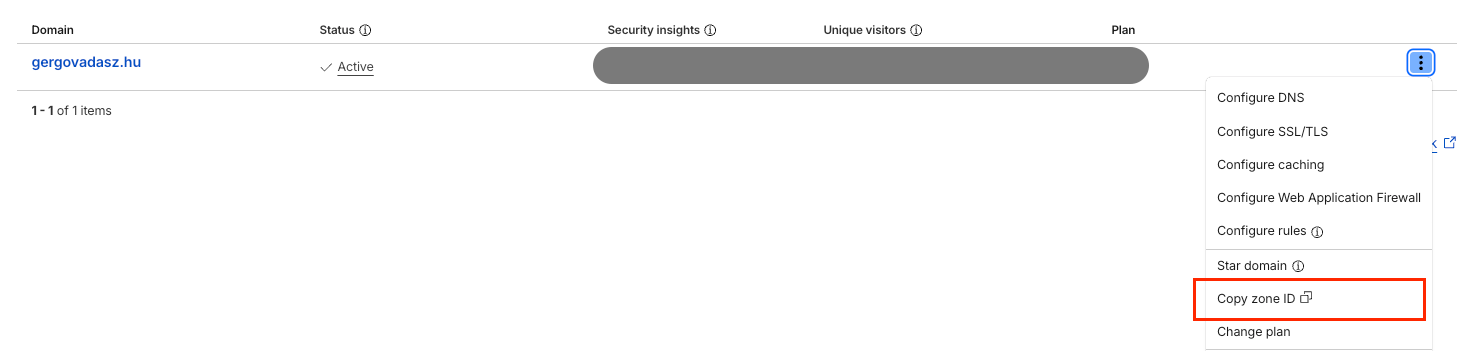
Zone ID - also visible on the Account Home page
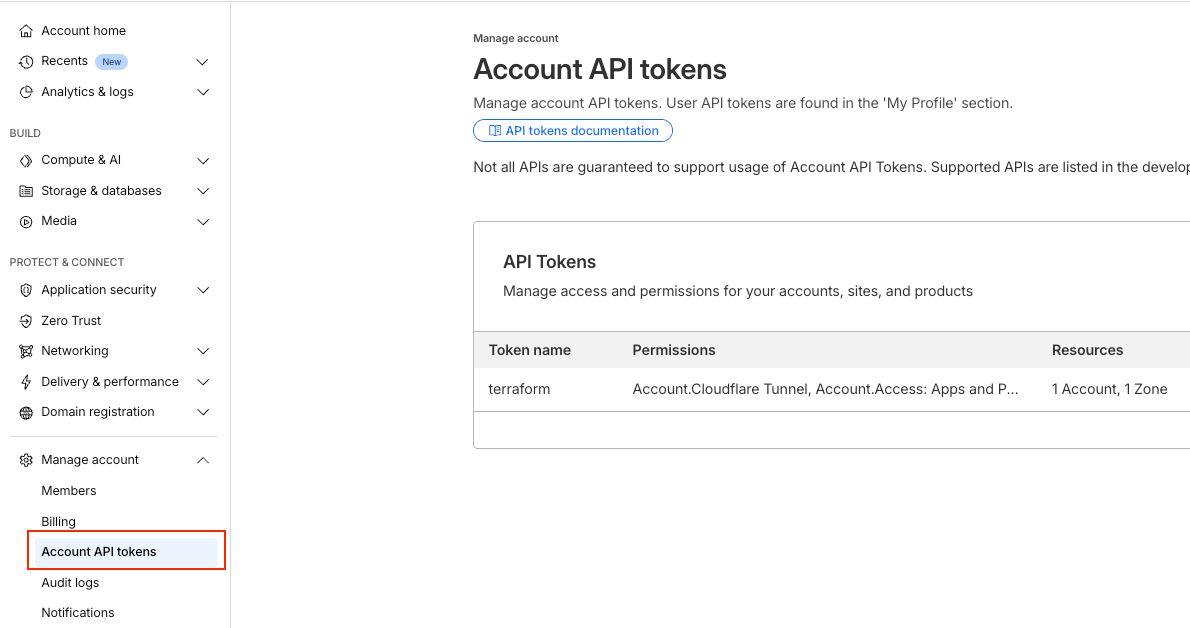
API Token – generate it under Manage Account / Account API Tokens. Make sure your token includes at least the following permissions:
- Cloudflare Tunnel: Edit
- Access: Apps and Policies: Edit
- DNS: Edit
- Zero Trust: Edit
Deploy with Terraform
Once you’ve filled out the terraform.tfvars file, you’re ready to deploy.
You can clone my public Terraform repository and adjust it with your own parameters:

Once you modify the terraform.tfvars with the necessary details, you can run terraform apply. The Cloudflare Zero Trust resources (policies, email list, cloudflared tunnel setup, access application) will be created quite fast, within seconds.
The virtual machine setup takes a bit longer.
First, Terraform provisions a VM in your Google Cloud environment. Then, the install-tunnel.tftpl script runs on the VM to:
- Update the OS
- Install required packages
- Create the static website
- Install and configure the Cloudflared tunnel
This step typically takes 5-6 minutes to complete.
If everything worked correctly, your website will be available at:
http_app.yourdomain.com
After email authentication (by default with one-time-password sent to your email), you should see a simple static webpage displaying your computer’s public IP address.
If you haven't changed anything in the repository code, only the authorized users (defined by their email addresses in cloudflare-config.tf file) will be able to reach it. You can modify this file to add other type of authentication and policies.
Conclusion
With the linked Terraform repository, you can easily deploy a private website and explore how Cloudflare Zero Trust works in practice - from secure tunneling to user access control.
This setup demonstrates how simple it can be to protect your applications using Cloudflare’s powerful policies and authentication features, without relying on a traditional VPN or complex network configuration.
Although this guide uses a Google Cloud virtual machine to host a sample static website, you can adapt the same approach to almost any environment — whether it’s a virtual machine, a Docker container, or even a home lab server. As long as your application can run Cloudflared, it can be integrated into Cloudflare Zero Trust.
The beauty of this setup is its flexibility:
- You can make your website completely private, allowing access only to specific users or groups.
- Or you can keep it public while still benefiting from Cloudflare’s global network performance, DDoS protection, and encrypted tunneling.
If you want to dig deeper, you can also extend this deployment with features like:
- Multi-user policies (different permissions per user or group)
- Device posture checks for stronger security
- Application logging and analytics in the Zero Trust dashboard
Feel free to explore, experiment, and build on top of this foundation.
If you have any questions about this setup or would like to learn more about Cloudflare and Terraform automation, don’t hesitate to reach out - I’m happy to help!